3.7. Extension: Building a Classification Tree#
We can use sklearn’s DecisionTreeClassifier to build a classification
tree. We’ll build an example using animals.csv. We represent each class using the numbers
0, 1 and 2.
0: Cat
1: Dog
2: Rabbit
This is the data we’ll be using.
import pandas as pd

data = pd.read_csv("animals.csv")
print(data)
Output
Weight (kg)  Tail Length (cm)  Ear Length (cm)  Class
0           2.2                 4                8      2
1           4.0                28                5      0
2           3.0                26                4      0
3          35.0                32                9      1
4           2.0                 3                7      2
5           3.5                16                7      1
6           5.7                25                6      0
7           2.8                 5                6      2
8          22.0                37                9      1
9           5.5                 3                6      1
10          3.2                 4                5      0
11          1.8                 3                5      2
To build our classification tree, we import it with the following:
from sklearn.tree import DecisionTreeClassifier
Then we create a DecisionTreeClassifier object:
tree = DecisionTreeClassifier(max_depth=height)
The max_depth is used to limit the height of the tree.
Finally, we fit the model to some data.
tree.fit(x, y)
We do this the same way we fit multiple columns when we performed multiple linear regression.
Note
x: must be a 2D array with n rows, one for each sample in the dataset and 1 column.
y: must be a 1D array with n values, one for each sample.
Here is a short example:
import pandas as pd
from sklearn.tree import DecisionTreeClassifier

data = pd.read_csv("animals.csv")
x = data[["Weight (kg)", "Tail Length (cm)", "Ear Length (cm)"]].to_numpy()
y = data["Class"].to_numpy()

tree = DecisionTreeClassifier(max_depth=3)
tree.fit(x, y)

print(tree)
Output
DecisionTreeClassifier(max_depth=3)
To visualise our model we’ll use some help from export_graphviz and graphviz.
First we need to import them.
import graphviz
export_graphviz is a function inside sklearn.tree, so we can import
this at the same time we import DecisionTreeClassifier.
from sklearn.tree import DecisionTreeClassifier, export_graphviz
First we extract out the information from our classification tree using
export_graphviz.
tree_data = export_graphviz(
    tree,
    feature_names=[input_variables],
    class_names=[classses],
    rounded=True,
    impurity=False,
)
feature_names: We provide the column names that correspond it to columns in x used to fit the model.class_names: Correspond to the class label in order 0, 1, …rounded=True: Is an aesthetic choice. It means the nodes in the output image will have rounded corners.impurity=False: Is another aesthetic choice and it means we don’t show the model purity. If you set it to True, it will display the gini index. A Gini index of 0 means the node is pure. The larger the value, the more impure the node is.
Finally we use the following to produce the tree.
graph = graphviz.Source(tree_data)
graph.render(filename, format="png")
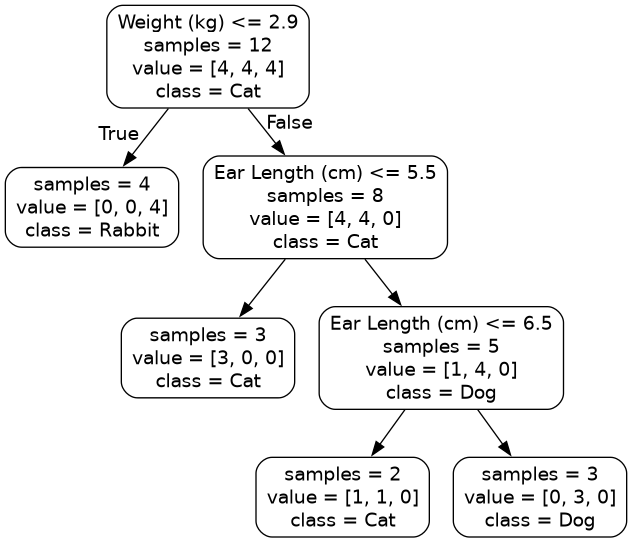
Here is an example:
import pandas as pd
from sklearn.tree import DecisionTreeClassifier, export_graphviz
import graphviz

data = pd.read_csv("animals.csv")
x = data[["Weight (kg)", "Tail Length (cm)", "Ear Length (cm)"]].to_numpy()
y = data["Class"].to_numpy()

tree = DecisionTreeClassifier(max_depth=3)
tree.fit(x, y)

tree_data = export_graphviz(
    tree,
    feature_names=["Weight (kg)", "Tail Length (cm)", "Ear Length (cm)"],
    class_names=["Cat", "Dog", "Rabbit"],
    rounded=True,
    impurity=False,
)
graph = graphviz.Source(tree_data)
graph.render("Tree", format="png")
Output